


Yahoo Inc. is launching a new site for women between ages 25 and 54, calling it a key demographic underserved by current Yahoo properties.
Amy Iorio, vice president for Yahoo Lifestyles, said internal research also shows women are looking for a site to aggregate various content and communications tools.
"These women were sort of caretakers for everybody in their lives," she said. "They didn't feel like there was a place that was looking at the whole them - as a parent, as a spouse, as a daughter. They were looking for one place that gave them everything."
Yahoo is entering a market already served by Glam Media Inc. and iVillage, a unit of General Electric Co.'s NBC Universal. It is Yahoo's first site aimed at a single demographic, although other Yahoo sites like Finance and Sports already draw specific audiences.
With Shine, Yahoo plans to expand its offerings in parenting, sex and love, healthy living, food, career and money, entertainment, fashion, beauty, home life, and astrology.
Read more
![]()

In Internet Explorer, click Tools > Internet Options.
- Under the General tab, in the Browsing history area, click the Delete… button.
- Click Delete forms… . Click Yes on the "Are you sure" prompt.
- Click Close and then OK.
Or
- Press the Windows key + R to bring up the Run dialog.
- Type RunDll32.exe InetCpl.cpl,ClearMyTracksByProcess 16 and press Enter.
The AutoComplete feature in Internet Explorer for Windows remembers usernames and passwords for secure sites. Unless you can secure your computer from outside access, you should disable this option. Otherwise, others can get to your secure information.
If you want to keep this information private, you need to disable the AutoComplete feature. To do this, follow the appropriate steps below.
- Open Internet Explorer.
- From the
Toolsmenu, selectInternet Options. - Click the
Contenttab. - In the "AutoComplete..." section, click the
Settingsbutton. You now have several options:
- To prevent your password from being saved, deselect the
User names and passwords on formscheckbox. - To prevent field entries from being saved, deselect the
Formscheckbox. - To prevent URLs from being saved, deselect the
Web addressescheckbox. - Click
OKtwice


Uncheck Auto Complete Settings
How To Delete Saved Form Data In Firefox


There is a utility in Windows Vista that will help you check the status of activation of your computer:
1.Click on start,type in CMD and press enter

Windows Vista also equipped with a Software Licensing Manager (SLMgr) command-line based scripting tool that can help to check and verify the activation status or license status of installed Vista.
2. This can be done by typing "slmgr -xpr" in the command prompt opened.This will show expiration date of current license if your vista copy is not activated and if it is activated then it would show the following.

There are more two command that would display license information.
slmgr.vbs -dli

slmgr.vbs -dlv
A new window will pop-up and it will display your Windows Vista License Activation Status


Zip Repair is a utility that will repair corrupt Zip files. Usually a corrupt Zip file gives the error message:"Cannot open file: it does not appear to be a valid archive"

Zip Repair creates an error free backup of your original file for instant access. No special skills required. A simple user interface with full install / uninstall support.
- NEW: Zip Repair will fix CRC errors in .zip files so that data can still be uncompressed
- NEW: Zip Repair supports spanned zip volumes. You can now repair and extract from a spanned zip set even if part of the set is missing.
- NEW: Full support for the Zip64 format
- NEW: Support for huge file sizes 2GB+ (as long as you have the disk space)
The trial version of Zip Repair Pro will recover files of 5mb or less for free.
Homepage
 Rapidshare
Photoshop Express is a free online photo editor that's not meant to replace Adobe's current offerings, but "make Adobe imaging technology immediately accessible to large numbers of people." And from the screenshot here you can tell it's not even a dumbed- down Photoshop, but an entirely new product.

This online version is a free service. Photoshop Express allows users to store up to 2GB of images, make edits to their photos, and share them, all online. This tool may not have all the features of Photoshop, but it has basic features needed to edit photos.
Another good feature of this tool is that you can reverse the changes made to the photos just like Photoshop. You can use any of the 17 editing tools to modify your images.
Photoshop Express also includes features that let you choose how to view and share photos. You can group your photos into albums or slideshows and a gallery feature lets you gather together your Web-based albums and slideshows. You can also change layouts, add captions, and email images or albums to family or friends.


In order to restore your computer just follow these simple steps:

The System Restore process can take anywhere from 10 to 30 minutes depending on how much reconfiguration Windows XP needs to do and how fast of a PC you have. When System Restore is done, a screen will popup with the results of the restore. If it was successful, you can then log into the system and start using the computer again. Any quirky issues that you were having are now hopefully gone.

Now, on step 7b above, "Create a system restore point" option. This option is for when you want to force Windows XP to take a snapshot of your system just before you install a program or alter any system settings that you are not sure of. It is like a safety net for when you install any internet programs (sometimes riddled with spyware) or system drivers (video, audio, etc). If you want to revert back to a virgin state just create a restore point "before" installing any software. This way, if your machine starts acting weird, you can just restore your settings from the selected point. With a little practice, the System Restore utility is easy to use.
Update:Download Single Click Restore Point (SCRP)
Single Click Restore Point (SCRP) is a tool for creating a restore point in single click. It will help you create a restore point without go through the System restore Utility. It is a good idea to use this utility before anu serious breakdown in your ocmputer
More Details here
Soashable is an Open Source (on SourceForge) web-based, multi-protocol instant messaging client written in pure Javascript.

Besides the hosted Web app that supports three major IM clients, you can take Soashable and integrate it into your personal site by installing it on your server. The chat windows are currently full of all sorts of debugging gobbledy-goop, but I successfully had conversations with people on AIM and Yahoo without a hitch.
Download from Sourceforge.net
Source:Mashable!
.Asia domains are available for registration from March 26th.This is available to individuals, businesses, organizations and community groups located in Asian countries.

List of asian countries where domains are available are listed in the website.

Stressed out?
Worrying about your next date or the big presentation to your boss? Feeling low? Instead of running to the closest book-store to find a trendy self-help book, get MindHabits. Find relief at the click of a mouse. A video game that is actually good for you? Now, that's a concept!
Based on social intelligence research conducted at McGill University, these stress busting, confidence boosting games use simple, fun-to-play exercises that help players develop and maintain a more positive state of mind. It is based on new scientifically tested tools published in a journal of the American Psychological Association that help players reduce stress and boost self confidence and esteem using principles from social intelligence research.
The games are as simple as finding a smiling face in a crowd of frowns - yet they are powerful repetitive training exercises demonstated to refocus the way your mind perceives the world. Research has demonstrated benefits from playing just five minutes a day. Give it a try and see if it works for you!
The Mind Habit game itself involves selecting words that positively reinforce your self-image ("Who Are You"), picking a smiling face out of a crowd of frowning ones ("Matrix"), and clicking on smiling faces in clouds ("Grow Your Chi") among other activities. You can play the demo here.

Mind Habits Game

Mind Habits Game Options

Hard Disk Sentinel is a windows application that will prevent hard disk failure.Hard Disk Sentinel (HDSentinel) is a multi-OS HDD monitoring and HDD analysis application. Its goal is to find, test, diagnose and repair hard disk drive problems, report and display HDD health, performance degradations and failures. Hard Disk Sentinel gives complete textual description, tips and displays/reports the most comprehensive information about the HDD inside the computer or in an external enclosure (USB / e-SATA). Many different alerts and report options are available to ensure maximum safety of your valuable data.
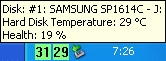
Hard Disk Sentinel monitors hard disk drive / HDD status, including health, temperature and all S.M.A.R.T. (Self-Monitoring, Analysis and Reporting Technology, built in most hard disks today) values for each hard disks. Also it measures the hard disk transfer speed in real time which can be used as a benchmark or to detect possible hard disk failures, performance degradations.
Here are some key features of “Hard Disk Sentinel”:
· Automatic analyse of hard disks
· Instant S.M.A.R.T. analysing
· Disk status in Windows Explorer
· Information on demand·
· Logging
· Alerts
· Hard Disk Details
· Hard Disk Performance
· Hard Disk Partitions
· Shutdown
· Acoustic Management
· Clock Synchronization
· Improvements

OS: Windows 95, 98, 98SE, ME, 2000, XP, 2003 or Longhorn/Vista
Home Page Size: 6.41 MB
![]() Rapidshare Or Filefactory Pass:freshdl.net
Rapidshare Or Filefactory Pass:freshdl.net

This interactive, multimedia CD-ROM brings the words and illustrations of The Oxford Picture Dictionary to life with sound and animation. Its rich assortment of games, exercises, and activities makes it flexible for use in conjunction with the Dictionary or on its own. Thematic content corresponds to secondary and adult curricula, with a strong job-skills strand. It can be used in classrooms, in language labs, or at home, and it can be easily adapted to individual, pair, or small group work. About the Oxford Picture Dictionary:
The comprehensive Oxford Picture Dictionary Interactive CD-ROM provides hundreds of hours of speaking, listening, reading, and writing practice, all on a single disc. The software has been designed for learners of English on a beginning to intermediate level.
Features of the Oxford Picture Dictionary
- Interactive CD-ROM:
- All 3,700 words of The Oxford Picture Dictionary are presented with sound and stunning visual images that provide easy access to meaning and pronunciation.
- Students can hear and learn to read, say, and spell any word they choose to explore.
- User-friendly navigation and help screens are geared to the special needs of language learners.
- A special viewer allows students to easily explore the whole graphic as well as zoom in for close ups.
- Vocabulary can be easily searched, either by contextualized topic page or through a pictorial glossary, helping students develop reference skills.
- A wide selection of activity types appeals to a variety of learning styles.
- Activities such as Conversation, Reading, "Job Talk," Dictation, Role Play, and Writing provide contextualized vocabulary practice in speaking, reading, writing, and listening.
- A built-in word processor encourages students to write about any Dictionary topic and print out their work.
- Easy lookup of words from readings, dialogues, and students' own writing is facilitated by hyperlinked referencing to the glossary.
- Games offer motivating, easily customized reinforcement activities.
- Flashcard Maker enables students to practice on-screen or print out picture/word cards based on their own word lists.
Randomly-generated tests for each topic page enable targeted testing and multiple retests, facilitating pre- and post-testing. - Summary and detailed reports allow students and teachers to monitor progress.
- A Teacher Management System on the same disc permits teachers to review and edit student information, as well as view tests and writing.
- The Oxford Picture Dictionary CD-ROM is authored by Elizabeth Hanson-Smith, Evelyn Fella, Norma Shapiro, and Jayme Adelson-Goldstein.
If you are interested in this product you may also want to look at the Oxford Picture Dictionary textbook. The Oxford Picture Dictionary is a wonderful reference book to introduce beginning English students to a core vocabulary. It includes 3,600 words subdivided into 140 different topics (fruits, anatomy, geography, etc.), with detailed, full-color illustrations, and is available in eleven bilingual editions for Arabic, Brazilian Portugese, Cambodian, Chinese, Haitian Creole, Japanese, Korean, Polish, Russian, Spanish, Vietnamese, and monolingual English.
System requirements:
A single CD contains both Macintosh and Windows installations, accompanied by a User's Guide.
Windows:
- IBM or compatible: 80486 or Pentium system.
- 16MB RAM (32MB preferred).
- OS: Windows 95 or later.
- Graphics/Monitor: sVGA or higher, resolution 640 X 480, 256-color mode.
- SoundBlaster compatible.
- CD-ROM drive.
- At least 10 MB of free space on hard drive.
- Student Data may be stored on the hard drive or on a floppy disk.
Macintosh:
- Graphics/Monitor: Macintosh with 256 colours, 640x480 display
- OS: System 7 or later
- Minimum 8 MB RAM
- CD-ROM drive. Size : 110 Mb
![]() Megaupload Link1 , Link2 , Link3
Megaupload Link1 , Link2 , Link3

Windows XP makes it easy to create a new partition using the graphical disk management tool. Here’s how:

1. Turn off your computer and install your new hard disk. It’s unlikely that you have any unpartitioned space on which to create a new partition on the drive already in the machine, so you’ll need to add a new drive. New drives typically don’t come preformatted, so you’ll need to create your own partitions and format them.
2. Start your computer and logon as an administrator. Click Start and then click the Run command. In the Open text box type: diskmgmt.msc and click OK.
3. A Wizard will appear when the Disk Management console opens. Go through the Wizard’s steps and allow it to initialize the new disk, but do not allow the Wizard to convert the disk from basic to dynamic.
4. You will see, on the left side of the console, disk icons that represent “Disk 0″, “Disk 1,” etc. Your new disk should be the one with the highest number. The size of the disk should be listed, and the word “Unallocated” should be just under the size. Right click where it shows the size of the disk and click the New Partition command.
5. Click Next on the New Partition Wizard Welcome page.
6. On the Select Partition Type page, click on both of the options and read the Descriptions. We’ll assume here you’re creating a primary partition. Select Primary partition and click Next.
7. On the Specify Partition Size page, type in the size of the partition. Depending on what you want to use the disk for, you might want to create more than one partition. Type in the size of the new partition in the Partition size in MB text box and click Next.
8. On the Assign Drive Letter or Path page, you can bind the partition to a drive letter or mount it in an empty NTFS folder. In this example, you’ll do it the old fashioned way and assign the partition a new drive letter. Select the drive letter and click Next.
9. You need to format the partition to use it. Always use NTFS unless you need to allow other operating systems on the same machine to access the drive. You can use the defaults, or customize the Allocation unit size based on the types of applications you want to run on the disk. Click Next.
10. Click Finish.
Make Your Windows Vista Ultimate Genuine For Ever
Windows Vista Final Activation.This is the final Activation of Windows Vista Ultimate Edition x86 / 32bit. This won’t work in other version of windows Vista like Business, Home, and Basic, only works for Ultimate Edition.

MultiExtractor is an application that allows you to extract/recover multimedia files. MultiExtractor is different from other extractors because:
- It extracts image/audio/video files (BMP, JPG, GIF, PNG, PCX, TGA, ICO, CUR, TIFF, EMF, WMF, XM, MOD, WAV, OGG, MP3, MID, S3M, AVI, MPG, DAT, ASF, MOV, SWF, BIK, SMK)
- It has a conversion support (PNG [ New ], BMP, JPG, ICO, Vista icons)
- It can extract files stored in Microsoft® Office files, Portable Document Format, Databases, raw or binary files (like *.doc, *.docx, *.ppt, *.pptx, *.xls, *.xlsx, *.pdf, *.db, *.raw, *.bin, *.hex...)
- It can also extract multimedia (stored as resources or binaries ) from PE files (*.exe, *.scr, *.dll, *.ocx, *.ax...)
- It can unpack archives (ZIP, RAR, CAB+InstallShield Cabinets, JAR, CHM) and extract data from them
- It has a dynamic explorer (all data is mapped)
- It has a very strong filtering options (like icon properties, image properties, size of files)
- It can extract encrypted/packed resources of executable file
- It uses drag&drop interface and clipboard.

Hardware Info (HWiNFO) is a powerful system information utility designed especially for detection of hardware.HWiNFO and HWiNFO32 are professional hardware information and diagnostic tools supporting latest components, industry technologies and standards. HWiNFO32 is a system information tool that detects hardware from your system.Both tools are targeted to recognize and extract the most possible amount of information about computer ’s hardware which makes them suitable for users searching for driver updates, computer manufactures, system integrators and technical exteperts too. Retrieved informations are presented in a logical and easily understandable form and can be exported into various types of reports.
Autorun.INF is usually used by CD Installers to autoplay their installations but Hard disks by default should not have AUTORUN.INF in the drive.
Now, it is possible that your computer is infected by those viruses if you try to display the content of the your computer through command prompt, using the dir /ah command.
The said virus hides itself inside a folder named Recycled. The folder has a hidden/system/read-only attribute, that’s why you can’t see it if you will use the Search window. When your system is infected by the said virus, it infects every drive connected to your PC by dropping VCAB.DLL to the internet temporary folder and creating the CTFMON.EXE to folder Recyled & AUTORUN.INF to the root directory of every drive. That’s why when you connect your USB sticks to the infected PC it will be infected immediately, the USB disks will be the new carrier for the virus. The program runs every time you start your computer because it copy itself in the Startup folder of the Start Menu. It also run every time your insert the infected USB disk and it triggers every time you Double-Click the infected drive (bcoz of the AUTORUN.INF). The virus infects .EXEs and .DLLs.
To check if your system is infected by the said virus without using an antivirus, do the following steps:Go to command prompt.
- Type CD\ in drive C to go the root directory
- Type DIR /AH and press ENTER key. This will display all hidden files in your drive C
- If you see a file AUTORUN.INF and a folder Recycled, then your system is infected.
- Try doing this to your USB drive and check if your USB stick contains the same folder and AUTORUN.INF, if it does then your system is really infected..
To remove it download and install a trial version of Trendmicro and scan your system.
To manually remove it follow the following steps.
Boot your system in Safemode
Go to command prompt, in Drive C do the following commands.
- Type -> ATTRIB -H -R -S AUTORUN.INF then press enter
- Type -> DEL AUTORUN.INF then press enter
- Type -> ATTRIB -H -R -S Recycled then press enter
- In Windows Explorer in Safemode, remove the folder Recycled in drive C use Shift-Delete to delete the folder.
- Repeat Step 3 to 6 for all drives of your system including the USB drive.
- Search for CTFMON.EXE in your system using the Search of Windows found in Start Menu. If you find a file that is not located in C:\WINDOWS\SYSTEM32, delete it immediately. Dont forget to empty the recycle bin afterwards (Usually the virus will copy itself in the Startup folder of the Startmenu. Check if the file is present there and delete it then.)
Click Start->Run->type REGEDIT.EXE
- Go to this key from the register HKEY_CURRENT_USER\Software\ Microsoft\Windows\CurrentVersion\Policies\Explorer
- Look for the entry NoDriveTypeAutoRun, double click the entry
- Type a new value : 0FF (Hex) for the NoDriveTypeAutoRun, this will turn off the AutoRun for all drives, and press ENTER
- Reboot the system.
Viruses that uses Autorun.INF
There are several viruses that uses the autorun.inf to spread itself such as the Bacalid (hides itself in ctfmon.exe) and the RavMon.EXE. These viruses set its file attributes to System+Hidden+Read-Only attributes so some anti-viruses will have a hard time detecting or finding them. These viruses save itself in the root directory of every available drives of the current infected computer and runs itself every time you Double-Click the drive. In USB Sticks and CDs that are infected by the virus runs automatically especially if drive autorun is enabled for the current drives (which is usually by default, autorun for drives are enabled).
Disable AUTORUN from Registry
Now you can disable the AUTORUN for all drives by configuring the registry. Open the registry by typing regedit.exe to the command prompt (if your still at the command prompt) or execute it in Run. Look for the HKEY_CURRENT_USER\Software\ Microsoft\Windows\CurrentVersion\Policies\Explorer as shown below:
Click the NoDriveAutorun DWORD entry and type the value HEX: FF (255 in Decimal). (If the NoDriveAutorun does not exists, you can creat it by right-clicking the right side area of the regedit window, then click New->DWord Value -> type NoDriveAutorun) Close the registry and restart the computer. This procedure will disable all the autorun for all drives of your computer and at least will prevent the autorun function of infected USB drives or CDs and avoid the infection of viruses like the Bacalid and RavMon.exe
If you want to prevent viruses that uses autorun.inf to infect your USB flash drive, try to do this:
1. Open your flash drive via Command Prompt (do this via Start->Run->cmd.exe)
2. Change your logged drive to your USB flash drive (e.g. if your drive is at drive E: then type E: on the command prompt then press enter)
3. Create a folder named: AUTORUN.INF on the root directory of your flash drive. (to do this type the command: MD\AUTORUN.INF). If an error: a subdirectory already exists… shows, try to follow the instruction above to remove existing autorun.inf before doing this instruction.
The reason why this will avoid future infection is that autorun.inf viruses usually generates a file autorun.inf. Having an AUTORUN.INF folder on the root directory of your drives will make virus programs unable to create their own autorun.inf file, virus can’t even overwrite it because it’s a folder and not a file…
Download remove autorun virus.exe :4 Shared
How to Remove Win32 AutoRun Worm - Funny UST Scandal - XMSS.exe
XMSS.exe Win32 AutoRun Files
- x:autorun.inf
- x:xmss.exe
- x:Funny UST Scandal.avi.exe
- %Windir%\autorun.inf
- %Windir%\xmss.exe
- %Windir%\Funny UST Scandal.avi.exe
Fixes Win32 AutoRun.* Worm
Here’s a few step to prevent Win32 AutoRun Worm.
- Disabled System Restore for Temporary - KB 264887
- Boot Windows in Safe Mode - KB 315222
- In Windows Safe Mode, Open Windows Registry Editor
- Windows Start > Run > Regedit
- Browse to the following registry settings ↓
- HKEY_LOCAL_MACHINE\SOFTWARE\Microsoft\Windows NT\CurrentVersion\Winlogon\Shell
- Replace explorer.exe, xmss.exe with exporer.exe

Delete all the following files
- C\autorun.inf
- C\xmss.exe
- C\Funny UST Scandal.avi.exe
- X:\autorun.inf
- X:\xmss.exe
- X:\Funny UST Scandal.avi.exe
- %Windir%\autorun.inf
- Windir%\xmss.exe
- %Windir%\Funny UST Scandal.avi.exe
- Clean All Windows Temporary Files
- Restart Windows
%Windir% refers to the Windows folder (e.g. C:\Windows, C:\WindowsNT) and X: is drive letters used by a removable or network drive

If you perform a repair installation of Windows XP, you must first insure that you uninstall Internet Explorer 7 first. Otherwise, once the repair installation is complete, Internet Explorer 7 will no longer function. The reason this happens is because the repair installation will not restore earlier versions of the files in the Program files\Internet Explorer folder. This will make IE7 incompatible with the IE6 files that are installed in the Windows\System32 folder.
To uninstall Internet Explorer 7, follow the instructions below:
Uninstall IE7 on a Windows XP SP2 system:
1. Go to Start>> Run. Type in: appwiz.cpl [Enter] or click OK.
2. The Add or Remove programs windows will now appear. Scroll the currently installed programs list to find Internet Explorer 7.
3. Click the Internet Explorer 7 entry and select the Remove button.
If Internet Explorer does not show in the currently installed programs list, follow the instructions below:
Restart Windows XP in the Recovery Console, here’s how:
1. Insert either the Windows XP startup disk into the floppy disk drive, or insert the Windows XP CD-ROM into the CD-ROM drive, and then restart the computer.
Note: If prompted, select any options that are required to start the computer from the CD-ROM drive.
2. Press “R” when the “Welcome to Setup” screen appears. This will start the Recovery Console.
3. In the event you have a dual boot or a multi-boot system, you will need to select the appropriate installation.
4. Type in the Administrator password when prompted. If there is no Administrator password, simply press ENTER.
5. At the command prompt, type:CD ie7\spuninst
batch Spuninst.txt
Note: Press ENTER after each command.
6. To exit the Recovery Console, type: exit [Enter]
At this time, it is OK to perform the Windows XP repair installation. Once the repair installation is complete. Open Internet Explorer 6 and be sure that it is functioning correctly. If IE6 performs correctly, you can now safely reinstall IE7.
Reinstall Internet Explorer 7:Here
Note: If after performing a repair installation of Windows XP the IE6 browser does not function, you will need to use a functioning web browser to install the IE7 installation package.
Steps
- Download the program IMG Burn
- Get a DL-DVD
- Open IMG Burn
- Click Write to a Disk
- Click at the top on Tools
- Choose Settings
- Choose the write tab
- Set Layer-Break To 1913760 (See Image)

- Select the .dvd file for burning
- Burn on 2.4x Speed
- Enjoy Playing Your Game!!!

GOM Player is a free multimedia player with popular video and audio codecs built-in. GOM Player includes many codecs (XviD, DivX, FLV1, AC3, OGG, MP4, H263 and more). Users don't have to install codecs separately.

GOM Player supports SMI, SRT, RT, SUB(with IDX) files for subtitle. You can specify margin, location, size, resolution, font and others. You can also enable shadow, view ASF files with subtitle, karaoke subtitle mode.
Along with different media format such as AVI, MPG, MPEG and DAT, GOM Player also supports streaming Windows media format (WMV, ASF, ASX). You can also watch DVD-quality videos with 5.1 channel audio output.

Screen capture allows you to take a screenshot of your video directly from GOM Player. Using the Burst Capture feature, you can take continuous screenshots upto 999 shots.
There are other endless number of advanced features. Customize brightness, contrast and saturation. Sharpen and add noise to your video. Try audio equalizer. Repeat a section of your video with our A-B Repeat feature. Fast forward/rewind a few seconds using left/right keys.


