

How to Compress Videos And Add Audio Tracks
Compressing large videos using the right formats and codecs can help bring down the size without having to sacrifice on quality.One of the easiest ways to encode videos is to use MediaCoder You will also be required to install Firefox , since MediaCoder uses Firefox in certain windows and interfaces.
![]() Adding Videos :You start by adding the videos you want to encode. With the program open, click Add File or Add Dir on the toolbar. Choose the files or the folder and click Open or OK. Do not attempt to encode already-compressed videos—you’ll end up with larger files and extremely high encode times.
Adding Videos :You start by adding the videos you want to encode. With the program open, click Add File or Add Dir on the toolbar. Choose the files or the folder and click Open or OK. Do not attempt to encode already-compressed videos—you’ll end up with larger files and extremely high encode times.
![]() Video Encoding Parameters :For encoding the video, you need to decide upon the codec and format. The codec is the software that will encode the video. The format is like a container that will store the data.AVI is one of the more commonly-used containers; XviD and DivX are codecs. In our case, we’ll use the MP4 container and the x264 codec.
Video Encoding Parameters :For encoding the video, you need to decide upon the codec and format. The codec is the software that will encode the video. The format is like a container that will store the data.AVI is one of the more commonly-used containers; XviD and DivX are codecs. In our case, we’ll use the MP4 container and the x264 codec.
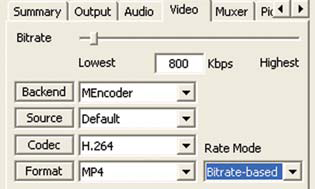
(x264 is an open source implementation of H.264). x264 has an edge in quality over XviD, which is more commonly used. The disadvantage with using x264 is the encoding time, which can be quite a bit more than with other codecs. After adding the videos to the queue, click on the Video tab. Choose the Backend as MEncoder. Set the Source as Default. Then choose the codec as H.264 and the format as MP4. Set a suitable bitrate or quality setting. For most digicam videos, 800 Kbps is good enough for the standard 640 x 480 resolution. We’ve chosen MP4 because of features like multiple audio streams. You’re free to choose other containers, but certain containers and codecs may not be compatible with each other.
![]() Audio Encoding Parameters :Click the Audio tab. Set the source as MPlayer, and the encoder as LAME MP3. LAME is a free encoder that comes with MediaCoder, and MP3 is flexible enough to support a wide range of quality settings—also, it’s compatible with most media players. In the panel on the right, click on the LAME tab to set the quality for the audio. Choose the rate as CBR (Constant Bitrate) if the source audio bitrates are low. VBR makes more sense when you have higher bitrates. The bitrate should suit that of your video. A minute of audio at a CBR of 320 Kbps will takearound 2.5 MB, whereas 128 Kbps (whisn’t too much of a quality drop compared to 320) will take around 1 MB. Also, remember that if the audio was recorded by your camera at 64 kbps, it isn’t going to make it sound any better if it’s encoded at 128 kbps.
Audio Encoding Parameters :Click the Audio tab. Set the source as MPlayer, and the encoder as LAME MP3. LAME is a free encoder that comes with MediaCoder, and MP3 is flexible enough to support a wide range of quality settings—also, it’s compatible with most media players. In the panel on the right, click on the LAME tab to set the quality for the audio. Choose the rate as CBR (Constant Bitrate) if the source audio bitrates are low. VBR makes more sense when you have higher bitrates. The bitrate should suit that of your video. A minute of audio at a CBR of 320 Kbps will takearound 2.5 MB, whereas 128 Kbps (whisn’t too much of a quality drop compared to 320) will take around 1 MB. Also, remember that if the audio was recorded by your camera at 64 kbps, it isn’t going to make it sound any better if it’s encoded at 128 kbps.

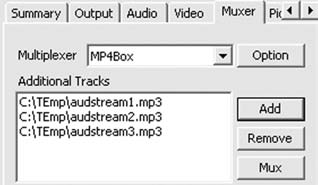
![]() Adding Multiple Audio Streams:To add multiple audio streams—for example, to add a commentary— click on the Muxer tab in the leftpanel, choose the multiplexer as MP4Box, click Add, and point to the audio files you want to add. Then click Mux, and choose a temporary location for the multiplexed file to be dumped to.
Adding Multiple Audio Streams:To add multiple audio streams—for example, to add a commentary— click on the Muxer tab in the leftpanel, choose the multiplexer as MP4Box, click Add, and point to the audio files you want to add. Then click Mux, and choose a temporary location for the multiplexed file to be dumped to.
![]() Encoding :Click on the Output tab and set the Output Folder. Finally, click Start. The time taken for encoding is mainly dependant on your system configuration, the quality and size of the video, and on the codec you’ve chosen
Encoding :Click on the Output tab and set the Output Folder. Finally, click Start. The time taken for encoding is mainly dependant on your system configuration, the quality and size of the video, and on the codec you’ve chosen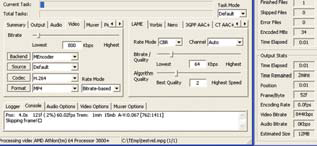
You’d probably want to send your encoded video to friends. For formats such as MP4 and codecs like H.264, the viewer would need to install ffdshow , or use a player such as VideoLAN.
Category: Audio, Compressor, Tips, Tutorial


0 comments