

Programs that require lots of memory may not run smoothly , if your PC has a low memory. To avoid this make your pen drive/USB of large size as RAM, which will make your system faster. It can be possible with any kind of Windows operating system, all you need is a pen drive of minimum 1GB memory ,better to prefer 4GB.To know how to do this, follow below steps.

1.Format your Pen Drive first
2.. Insert the Pen Drive with 1GB at least in the USB port, Wait for the PC to detect the pen drive.
3. Right click on My Computer--> Properties.

4. Select Advanced System Settings.

5. Select Advanced—> Performance –>Settings

6. Under Performance Options Select Advanced –>Virtual memory Change

7. Uncheck Automatically manage paging file size for all drives Click on Custom Size.Select your Pen Drive . Enter the same in the Initial and Max columns in the Custom Size .The size depends upon your free memory capacity of your pen drive. So you can change this limit according to your pen drive size.

8. Click on Set button, then click on OK.

9. Now restart your PC.Finally check the general start up time and also speed of your PC.This trick will surely improve the performance of your computer and increase operational speed in low cost.
In Gmail , the default action when you click reply is to include all of the e-mail you’re replying to below your message. Sometimes this results in long reply chains and lots of irrelevant information being forwarded along. Suppose you don’t want to include all of the text, instead only the relevant ,just an important line or a picture .Improved Gmail web interface has the answer for that.
Gmail's fantastic feature is easy to use. Just highlight the text you want to be in the reply e-mail, and then click the reply button on Gmail’s interface. You’ll get a reply with just the highlighted information selected. See this example below of before and after.
Before

After

Google enabled a new lab feature -email preview pane- for Gmail to compete against their arch rivals like Microsoft’s Hotmail, Yahoo! Mail and other Webmail programs.The Preview Pane lets you preview your Emails without opening them, and allows you to quickly browse through all your emails quickly. With this three-window panel layout , users can read or reply to one email while also being able to see a preview of any other email that land in their inbox.

You can go into the Gmail Labs tab under Gmail and enable the option.With this you can alter the panes between vertical and horizontal orientations.You can enable this using the dropdown button .It is in the upper right-hand corner, which allows the user to switch between the traditional list view and the new preview pane mode.


Gmail also allows you to adjust how many seconds you can spend looking at a message's preview before that message gets marked as read; the default is 3 seconds.

“Undo Send” is one of the useful Gmail Labs feature which enables you to “unsend” the emails right after you have clicked on the “Send” button.You could un-send emails for up to 5-20 seconds until now, as Gmail delayed the emails for 5-20 seconds before it actually sent them.
Google team has recently enhanced the Undo Send feature in GMail, which allows user to un-send emails after you have sent them.So this giving you more time to correct your mail in case there were any mistakes.You can set the Undo Send time limit to 5, 10, 20 or 30 seconds by enabling Gmail > Settings > General > Undo Send

Windows includes a utility that scans your Windows 7 system for corrupt, changed or missing system files. Normally you run this utility in booting off the DVD into repair mode but running this from the command prompt is much easier.To run this utility , you will need to open a command prompt in administrator mode and follow the steps.

- Go to Start menu.
- Select All Programs and then Accessories
- Right-click on Command Prompt and select Run As Administrator.You can run the service in Command Prompt, by using the following syntax: SFC [/SCANNOW] [/VERIFYONLY] [/SCANFILE=] [/VERIFYFILE=] [/OFFWINDIR= /OFFBOOTDIR=]
- Press Enter

This will scan and attempt to repair any files that are changed or corrupted. You can run that command with sfc /scannow.
One of the annoying “features” of Windows 7, is the white flag that pops up to inform you that how to solve a specific problem by Windows. Action Center alerts you when potential computer problems exist such as the virus protection being out of date, a backup needing to occur, or if your computer needs to be restarted etc.

For various reasons you may not want to see such warning messages.You can configure your Windows 7 to disable such security flag notifications
- Right click on the Windows 7 Security flag icon.
- Click on “Open Action Center”.
- Now click on “Change Action Center settings” on the left side of the screen.

- Uncheck “User Account Control”, then click on OK

All of you are familiar with the amazing background images on bing.com.Now you can add and change the beautiful background images on Google.com. By adding this feature Google just made your Google starting page more interesting.You can choose an image from your Picasa Web photos, your computer or a Google public gallery.For this you have to sign in to your Google Account in the top right corner of the Google homepage.Then check for a link “Change Background Image” can be found in bottom left corner.


You can remove your background image at any time by clicking Remove background image in the bottom left corner of the homepage.
When you are trying to change the “Display Properties" on Desktop sometimes you can view only "Themes" or few “tabs”. The other tabs like "Desktop", "Screen saver", "appearance" and "Settings are may missing. What could be the problem?The most likely cause of this is malware utilizing Group Policy Objects which enforces policies for system settings and/or user account(s) settings.

First you have to ensure there is no malware in your PC.Now you have to manually do the registry value change or by running registry fix from Kellys-Korner.Before making any changes to the Windows XP Registry, please backup your Windows XP Registry
Start> Run> type “Regedit“ without quotes and navigate these two locations:
HKEY_CURRENT_USER\Software\Microsoft\Windows\CurrentVersion\Policies\System
HKEY_LOCAL_MACHINE\Software\Microsoft\Windows\CurrentVersion\Policies\System
In the right-pane, delete the following values if found:
- NoDispAppearancePage
- NoThemesTab
- NoDispBackgroundPage
- NoDispScrSavPage
- NoDispSettingsPage


If none of the above Policies are set (in both of the locations above), ,Still the display properties tabs are still missing except for the Themes tab, try these commands from Start, Run dialog:
regsvr32 themeui
regsvr32 /i shell32
Restart Windows
Visit Kellys-Korner and apply the Registry Patch(line 285)
http://www.kellys-korner-xp.com/regs_edits/restorealldisplaytabs.reg
Also check : http://support.microsoft.com/kb/922370/en-us
You may also want to perform an XP System Restore by going to Start > All Programs > Accessories > System Tools > System Restore. There you can select a date prior to when the issue began. This can also be done in Safe Mode .
A very handy feature of Windows 7 System Restore available with one click away.Just right click on any file or folder and you can see “Restore previous versions” in context menu.

Windows 7's System Restore is different from earlier Windows versions.In Win 7 , it will list all Previous versions of selected file or folder from various restore points. You can simply copy, restore or open to see files from Previous Restore point.So there is no need of full system restore. If you have accidentally deleted any specific file or folder you can simply use “Restore previous versions” feature to copy or restore to its original state.
Eventhough Restore points can take up several gigabytes of hard drive space.If you are disabling System Restore ,you can reclaim the space but by doing so, you will not be able to restore your computer to a given point in time. An alternative you can delete all the restore points except for the most recent one. To accomplish this in Windows 7:
1. Click Start, type Cleanmgr.exe and press Enter.

2. Select the appropriate drive letter from the list and click OK.
3. Click Clean up system files. Disk Cleanup restarts in elevated mode. 
4. Select the appropriate drive letter from the list and click OK.
5. Click the More Options tab.
6. Under System Restore and Shadow Copies, click Clean up.

7. Click OK.
In Windows 7, by default there is a delay in displaying the Start Menu when you click it. This is a delay induced by purpose to allow Mouse Response times. However, the default delay time might just prove a bit too long and make you feel Windows is slow. To speed up the Windows Start Menu, edit the value of the Registry Key and set a lower values which suits your need.
Here is how to do it
- Open the Start Menu.In the search box, type regedit and press Enter.

- Navigate to HKEY_CURRENT_USER\Control Panel\desktop. In the right pane, right click on MenuShowDelay and click on Modify.

- Type in a number between 0 to 4000 (400 is default) for how many milliseconds you want the Menu to wait before it opens.Click on OK to apply and close the registry editor.Restart the computer to apply changes.
Unlike in XP and Vista, in Windows 7, you can change the background without having to use any external software. For that, you must activate a function in the registry and then integrate a photo of a suitable size.
![2-8-2010 07-06-38[3]](https://blogger.googleusercontent.com/img/b/R29vZ2xl/AVvXsEhVuiqpRxpvJ3Lxr4l54MjbTt5-P8v2PsKMSPl0N-tFeCl3xRabypWXYQHNTZMtrZzd3l4r7mTDmjJ-DermhLnMFa3K5MLdCOE_44XzQqvIr2rtvx81pyApbLOXBMfxNfRWQPqYX8vF8ynP/s1600-h/2-8-2010%2007-06-38%5B3%5D%5B5%5D.png "2-8-2010 07-06-38[3]")
Activating a function: First,enter ‘regedit’ in the search field of the tart Menu and press Enter. Now confirm the question regarding the user account administration with ‘Yes’ and navigate to the key
HKEY_LOCAL_MACHINE\SOFTWARE\Microsoft\Windows\CurrentVersion\Authentication\LogonUI\Background’
On the right side in the window,search for the value ‘OEMBackground’. If that is not available, create it using ‘Edit| New | DWORD-value’. Double-click on the new entry to edit, change its ‘value’ to ‘1’ and confirm with ‘OK’. Then close the registry.
Preparing the Photo: Windows uses the file ‘backgroundDefault.jpg’ as the background picture and scales it to the current screen resolution, as long as no other file is available in the suitable pixel format. The files for special formats must be in the form ‘background 1024x768.jpg’. Here, the file names should include both values of the screen size. The best option is to edit the different image versions using a graphics program. While doing so, take care that the maximum file size does not exceed 256 Kb. If required, reduce the image quality of the JPG-file.
Copying in the System Folder :Now copy the edited JPG-files in the actual folder meant for OEM-providers ‘%windir% n\system32\oobe\info\backgrounds’. Since this is not available in most systems, you need to create it. For that, and to copy the files, you need writing rights. Therefore, open Windows Explorer with administrator rights by entering ‘explorer’ in the input field of the Start Menu, right-click on the program entry and then open ‘Run as administrator’ from the context menu. In Explorer,navigate to the folder ‘%windir%\system32\oobe\info’. Right-click on it, open ‘Properties’ and switch to the‘Security’ tab. There, click on ‘Edit’ and mark ‘Administrators’ as the group or user names. Activate the Option ‘Allow’ in the line ‘Complete access’ and confirm with ‘Accept’ and ‘OK’. After another click on ‘Yes’ you can create the sub-folder ‘\backgrounds’ and copy the JPG-pictures there.
From the next login, Windows 7 will greet you a background picture of your own choice.
UAC (User Account Control) is One of the annoying features of Windows which is popping up and asking permission for about everything.It is to protect windows operating system by preventing unauthorized changes to your system and that require administrator permissions . It is also a security feature that will block malicious software from making key system changes without your permission. However UAC in Windows 7 is less annoying and more friendlier now.To change the UAC notification settings navigate to Start > Getting Started > Change UAC settings.

You can adjust the default level ( notify you when programs try to make changes to the computer) to what your most comfortable with and to completely turn it off slide it down to Never notify.

Click OK to make the change effective.Reboot your PC.
You can also disable UAC with Registry Editor
1.Startmenu->run .Type regedit & press enter key
2.Navigate to HKEY_LOCAL_MACHINE\Software\Microsoft\Windows\CurrentVersion\Policies\System
3.Locate the following REG_DWORD value:EnableLUA

4.Change the value of EnableLUA to 0.

To suppress the UAC permission prompt dialog,
1.Navigate to the ConsentPromptBehaviorAdmin REG_DWORD value
2.Change value the default value of "5" to "0 " (optional).
3.Exit the Registry Editor and Restart the system

Snipping Tool is a utility included in Windows 7 and Windows Vista.It is a screen-capture tool that allows taking screenshots of an open window, rectangular areas, a free-form area or the entire screen. With Snipping Tool you can capture text, graphics, and any associated annotations and then save them in your desired format ie in PNG, GIF, or JPEG or an HTML page, or e-mailed.Snipping Tool is available only in the Home Premium, Professional, and Ultimate editions of Windows .Microsoft has not defined a default keyboard shortcut for Snipping Tool both in Vista and Windows 7, s o it is not easy to find out the tool quickly from Start Menu.

You can create a keyboard shortcut for Snipping Tool as follows
1.Start>Accessories
2.Select the properties by right clicking the Snip Tool

3.Select the Shortcut key box, now press any desired keyboard key as your shortcut to the program and apply it.If your assign key is “S” , then you need to press Ctrl + Alt + S to launch it.

Whenever you browse folders containing video or media files in Vista, may get the error COM Surrogate has stopped working . This occurs mainly because of codecs and other COM components installed by various software that aren’t compatible with Vista.
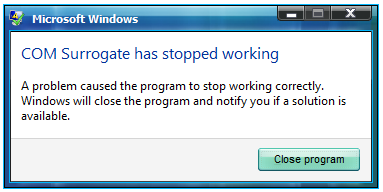
If you use a codec pack, uninstall it and check if the problem is fixed. Try installing individual codec from here on.If you are using Nero or DivX , then upgrade to their latest versions .Also try to disable Thumbnail previews.
One more possible solution is turning off DEP for dllhost,for that do the following
- Right click on Computer, and choose Properties
- Now click on Advanced System Settings, and then under Advanced, click Settings> Click the “Data Execution Protection” tab, and then click “Turn on DEP for all programs
- Click on the Add button, and then browse to C:\Windows\System32\dllhost.exe ,Click Open, and then OK.
Whenever you have to select multiple files, you need to keep the [Ctrl] key pressed while clicking on filenames. How many times has it happened to you that you let go of the
[Ctrl] key before selecting another file and your entire selection was lost? It’s irritating when sorting large number of files. Windows 7, however, comes to your rescue with checkboxes that allow you to select files without having to hold the [Ctrl] key.
- Once in a folder, Click on
- Organize > Folder and Search Options.
- Go to the View tab.
- Under Advanced settings, check the item labeled “Use check boxes to select items”
- Press Ok and you are done.


Many people find it annoying to have the address bar above the menu bar,especially those who have been using older versions of Internet Explorer that had the menu bar above all the other toolbars. There's a simple registry tweak that can move the address bar below the menu bar. To do so, follow the steps as mentioned below.
- First, if Internet Explorer 8 is running, close it.
- Click 'Start | Run'.
- Enter 'regedit' in the textbox and click 'OK'.
- Navigate to the following folder in the left pane, 'HKEY_CURRENT_USER| Software | Microsoft | InternetExplorer | Toolbar | WebBrowser'.
- In the right pane look for the entry 'ITBar7Position' and double-click it.
- Enter the 'Value data' as '1' in the 'Value data' box. The default value will be '0'.

Windows stores your most recently visited website addresses in a special DNS cache on your hard drive. Your web browser accesses this cache of known addresses before it goes out to the Internet to send a URL request to an external DNS server. If the web address you’re looking for is in the cache, it gets used by your browser, saving valuable browsing time. You can speed up your browsing by increasing the size of this DNS cache. A bigger DNS cache enables addresses for more websites to be stored locally, which means fewer external DNS lookups. To increase the size of your computer’s DNS cache, you have to edit the Windows Registry, which is the large database where all the configuration settings for your system are stored. You edit the Registry using the Registry Editor utility. Here’s what you need to do:
1. Open the Start menu, enter regedit into the search box, and then press Enter.
2.When the Registry Editor, navigate to the HKEY_LOCAL_MACHINE\SYSTEM\CurrentControlSet\Services\Dnscache\Parameters key.
3. Select Edit, New, DWORD (32-bit) Value.

4. Name this new item CacheHashTableBucketSize.
5. Right-click this new item and select Modify.
6. In the Value Data dialog box, change the value to 1.

7. Select Edit, New, DWORD (32-bit) Value.
8. Name this new item CacheHashTableSize.
9. Right-click this new item and select Modify.
10. In the Value Data dialog box, change the value to 180.

11. Select Edit, New, DWORD (32-bit) Value.
12. Name this new item MaxCacheEntryTtlLimit.
13. Right-click this new item and select Modify.
14. In the Value Data dialog box, change the value to ff00. Note, these are zeroes.

15. Select Edit, New, DWORD (32-bit) Value
16. Name this new item MaxSOACacheEntryTtlLimit.
17. Right-click this new item and select Modify.
18. In the Value Data dialog box, change the value to 12d.

For these changes to take effect, you need to close the Registry Editor and restart Windows. You should notice a slight speedup when next you browse the Web.
BY default, Internet Explorer 8 contains a textbox besides the address bar that has ‘Bing” in it. This textbox can be used to search data on the Internet and acts just like a regular search engine. The reason this feature has been added is to create a quicker means of searching data on the Internet, without requiring the user to visit the particular search site. To search a particular term using this search box, simply enter the search text in the textbox. Click the dropdown box near the textbox and select the search engine and click 'OK'. To add more search engines to this list simply follow these steps:-
- Click the drop-down box near the search textbox that lets you select the search engine of your choice.

- Click 'Find More Search Providers'. The Internet Explorer 8 Add-ons Gallery' page will be displayed with the list of supported 'Search Providers'.

- Click the 'Add to Internet Explorer' button that corresponds to the entry in the list that you would like to add as a search engine.
- A dialog box will appear on your screen with two checkboxes. Select both the checkboxes and click 'Add'. This will set the selected search engine as default.
To change the settings of the search provider, click the drop-down box near the search button again and select 'Manage Add-ons'. Select a particular search engine from the list and select the status. For instance, if you have just set 'Google' as the default search engine and wish to change it to Ask.com then click the entry in the list and click 'Set as default'. For added controls and settings you can right-click the name of the search engine and change settings such as sorting it, copying it or removing it from the list altogether.


