The System Tray is full of icons that represent programs that can either be started quickly or are running in the background.Is your system tray full of unused and unwanted icons?
To remove one of these icons from your system tray, perform the following steps:
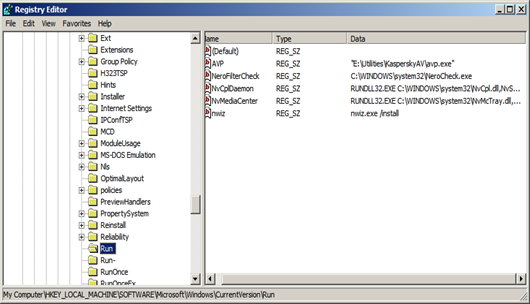
- Start regedit.exe.
- Go to HKEY_LOCAL_MACHINE\SOFTWARE\Microsoft\Windows\CurrentVersion\Run.
- Select the run value you want to remove (e.g., Microsoft IntelliType).
- Click Del.
- Close regedit.
The first step is to identify the program that the icon represents and decide if it needs to be in the system tray .Hold the mouse cursor over the icon to see the name of the program the icon launches.
The best bet is to right-click on the icon to see if this opens the program's options box. If it does, check around for a selection similar to 'Remove from System Tray' or 'Check here if you don't want this program to load with Windows
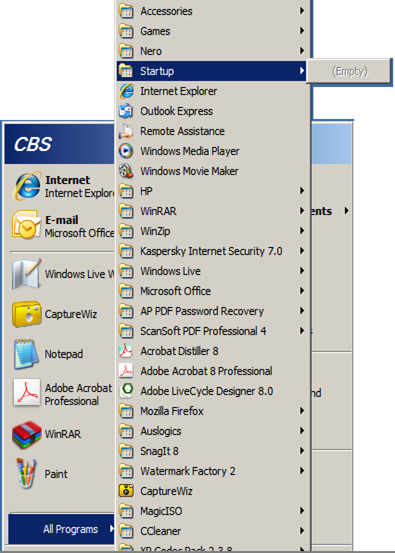
The other place to check is your Start Up menu. This is a folder that contains applets that start when you boot Windows.
The folder in Windows XP can be found in C:\WINDOWS\All Users\Start Menu\Programs\StartUp or C:\WINDOWS\Start Menu\Programs\StartUp. In Vista it can be found in C:\Users\[user name]\AppData\Roaming\Microsoft\Windows\Start Menu\Programs\Startup
To stop these programs from launching and appearing in your System Tray on Windows start up simply delete the icons in this folder
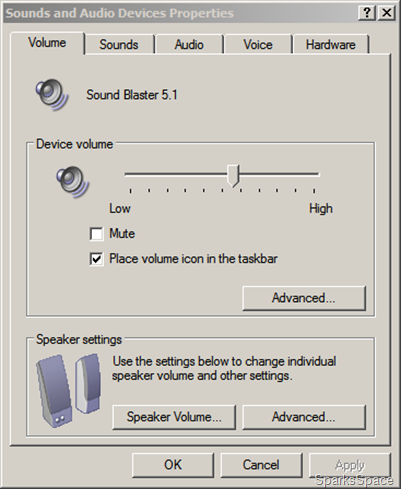
Another place to look for applets that pop into the System tray uninvited is the Control Panel.Under the Multimedia icon, click on the Audio tab and click on the “Show volume control on taskbar” option.
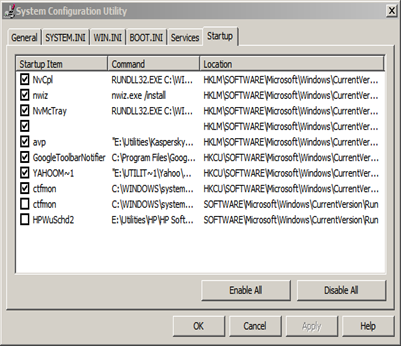
Start>Run> type ‘msconfig’ in the openbox. In msconfig click on the Startup tab to see all the programs that Windows opens when it boots. Uncheck the ones that you don’t want to start, but be careful which ones you choose to disable as there are some key programs that need to start.
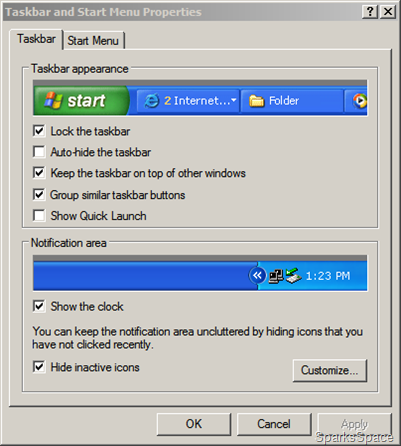
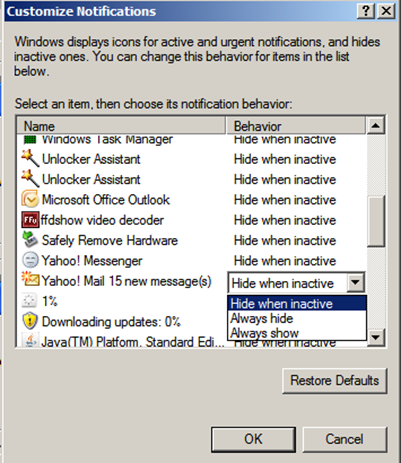
You can customize the taskbar systemtray by right-click on the Start button and choose Properties. Choose the Taskbar tab and click on the button near the bottom marked Customize...
Startup Control Panel is a nifty control panel applet that allows you to easily configure which programs run when your computer starts.Download
Avira AntiVir Rescue System is a Linux-based application that allows accessing computers that cannot be booted anymore. Thus it is possible to:
- repair a damaged system,
- rescue data,
- scan the system for virus infections.
- Just double-click on the rescue system package to burn it to a CD/DVD. You can then use this CD/DVD to boot your computer.
The Avira AntiVir Rescue System is updated several times a day so that the most recent security updates are always available.
Kaspersky Rescue Disk is another alternative
Back up your registry before you try this hacks.
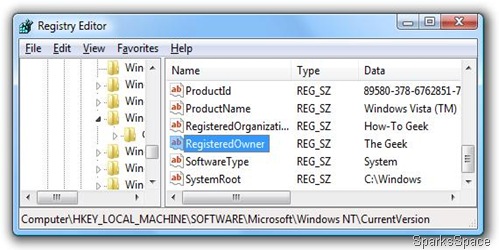
1. To change the name of the registered user or company, browse to HKEY_LOCAL_MACHINE\Software\Microsoft\WindowsNT\CurrentVersion and look for RegisteredOwner and RegisteredOrganization. Double click on them and change the values
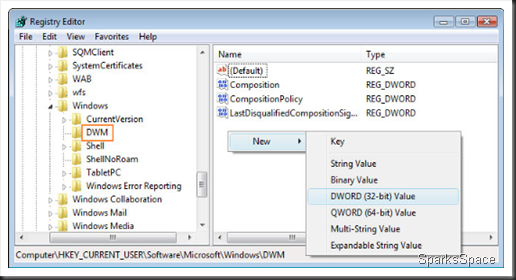
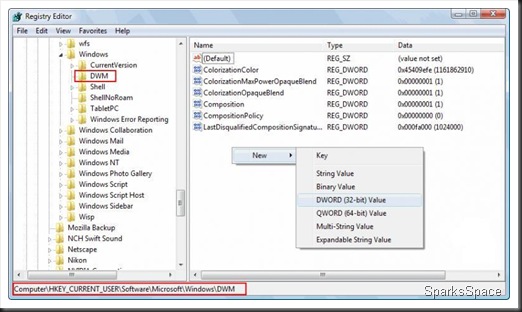
2.If you have a sufficiently powerful machine and love the animations in Vista, you might want to slow them down a bit. Navigate to HKEY_CURRENT_USER\Software\ Microsoft\Windows\DWM. Once there, create a new key by right clicking on the space below existing keys and choose New > DWORD (32 bit) Value. Call it AnimationShiftKey and enter the value as 1. After rebooting the machine, whenever you want to slow down the animations, press the [Shift] key before it starts.
3. Encrypting and decrypting files in Vista is a multi-click process which takes a fair bit of navigating. With a registry hack, this task can be done with a simple right-click. Navigate to HKEY_CURRENT_USER/Software/ Microsoft/Windows/CurrentVe rsion/Explorer/Advanced and create a new 32-bit DWORD. Call it EncryptionValue and use the value as 1 there. After the system is restarted, you can get encrypting with just a right-click.
4.Speeding up Flip3D: Eye candy is well and good, but not all of us have top of- the-line graphic cards to render all the slick effects. This hack will limit the number of windows that are rendered in 3D, which will hopefully let you have your cake and eat it too. Navigate to HKEY_CURRENT_USER\Software\ Microsoft\Windows\DWM and create a new DWORD value called Max3DWindows. The value should be set to a number between 4 and 9: higher the number the more muscle your graphics card needs to pack. Try it out with different number values by opening multiple windows and checking out the difference.
After Windows XP boots up to Welcome Screen or Logon Screen for user to log on to Windows desktop, there may be a message on the Logon Welcome page that user have certain number of unread mail messages,like this….
How to get rid of this annoying display?Here’s how to do it:
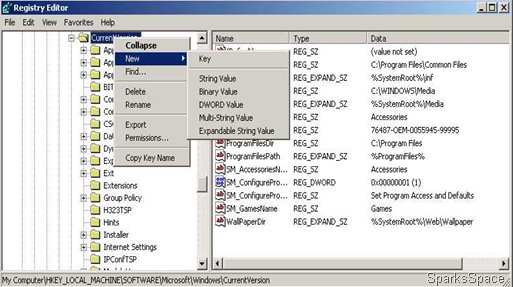
Start the Registry Editor: Start > Run > regedit > [Enter] Navigate to HKEY_LOCAL_MACHINE\ SOFTWARE\Microsoft\Windows\CurrentVersion
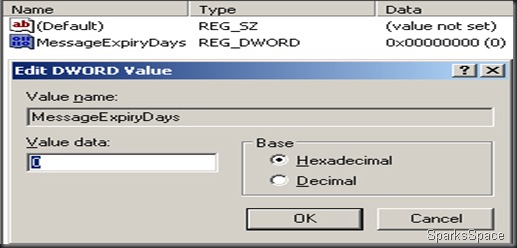
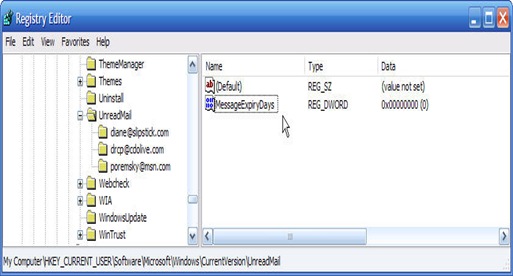
Right-click on the CurrentVersion key and select New > Key. Name this UnreadMail. Right-click on the blank area on the right side, and select New > DWORD Value. Call it MessageExpiryDays and give it a value of 0. You may need to log off or restart for the changes to take effect.
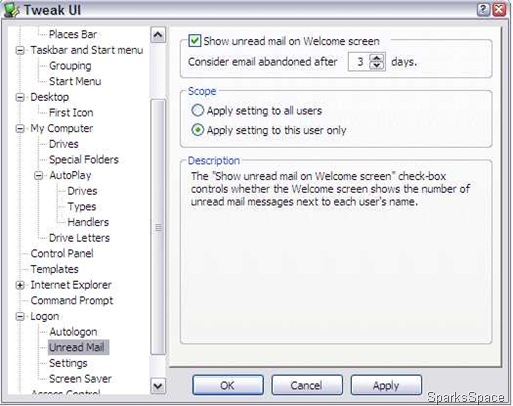
Easy way is to use TweakUI that can be downloaded from Microsoft Download Center. After installing the TweakUI, run the program, locate and select Logon in the left pane. Then click on Unread Mail. Unselect and uncheck the Show unread mail on Welcome screen option.
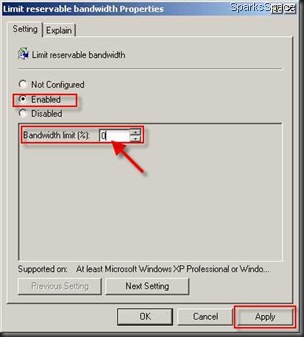
Windows XP reserves 20 per cent of your Internet bandwidth for Quality of Service. This is unnecessary, and can be disabled:
- Open the Group Policy Editor: Start > Run > gpedit.msc > [Enter] In the left-hand column in the window, navigate to Computer Configuration > Administrative Templates > Network > QoS Packet Scheduler.
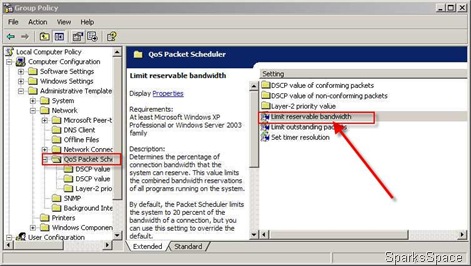
- In the right column, double-click Limit reservable bandwidth and select Enabled.
- Change the Bandwidth Limit to 0 and click OK.
When you open C drive or other drives by double click it'll pop up Open With windows and ask you to choose the program to open that drive.?Or errors such as
- Access Denied
- VBScript error with error code of 800A041F
- Drive opens in new windows
Solution-I
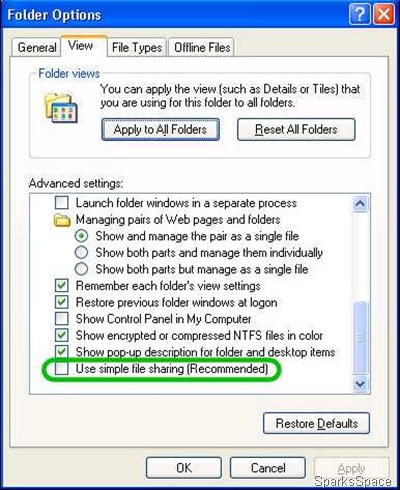
Open control panel (classic view)/folder options. Scroll down advanced settings window and uncheck the "use simple file sharing".Apply and right click on the volumes in question, select properties and click on "security" tab.(You need to set permissions on those volumes in the administrator rights.)
There you'll see detailed sharing permissions/restrictions for all relevant accounts on that particular drive/file/folder. (Taking that you have administrative permissions) click on "Administrators ([computer name]\Administrators)" (first one from the top) and check allow on "full control" and click "apply".
If you see your account name on the list, either remove it or allow full control. If you are only user on that PC I suggest removing it from the list, for you are administrator and comply with "administrators" permissions.
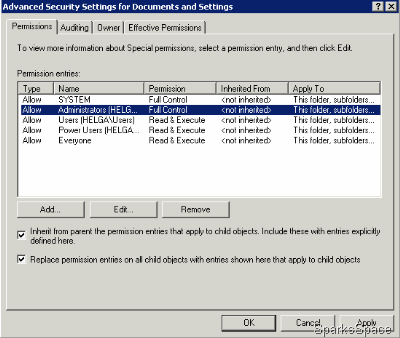
After setting the permission, click on the "advanced" button. In the first tab select "Administrators ([computer name]\Administrators)" (same as before) and check the "Replace permissions entries on all child objects with entries shown here that apply to child objects" and apply
Solution-II
Normally when a virus infects a windows system which causes a drive opening problem, it automatically creates a file named autorun.inf in the root directory of each drive.
This autorun.inf file is a read only ,hidden and a system file and the folder option is also disabled by the virus. This is deliberately done by the virus in order to protect itself. autorun.inf initiates all the activities that the virus performs when you try to open any drive.
Follow the set of commands below to show and delete the autorun.inf
- Log in as Administrator or user with administrator rights.
- Turn Off system restore.
- Start-->> Right Click My Computer-->> Properties-->> System Restore Tab-->>Turn off System Restore on all drives-->> Apply-->> Ok.
- Launch Task Manager by pressing alt+ctrl+del
- click on processes tab.
- Find wscript.exe, If it is running end this process..
- End EXPLORER.EXE process from Task Manager
- Open Start>>Run and type cmd and press enter. This will open a command prompt window. On this command prompt window type the following steps.
- Type cd\
- Type attrib -r -h -s autorun.inf
-
Type del c:\autorun.* /f /s /q /a
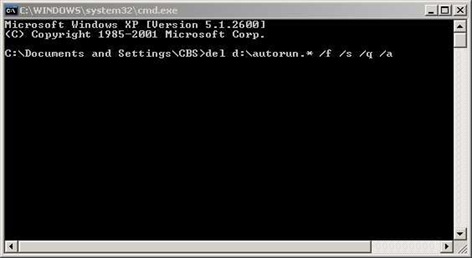
del d:\autorun.* /f /s /q /a
- Now type d: and press enter for d: drive partition. Now repeat steps 3 and 4. Similarly repeat step 5 for all your hard disk partition
- Start>Run>Type ’regedit”. Navigate to the following registry key:
HKEY_LOCAL_MACHINE\SOFTWARE\Microsoft\Windows NT\CurrentVersion\Winlogon
Find this key: userint.exe .make sure its value is Userinit”=”C:\WINDOWS\system32\userinit.exe,If, It is not, than changed value to this value.
- Restart your system .
Easiest way is Download Flash_Disinfector.exe file (101.6 kb)/Mirror link and run that file ...your problem solved... Your screen will go blank for a while but don't worry ..its normal
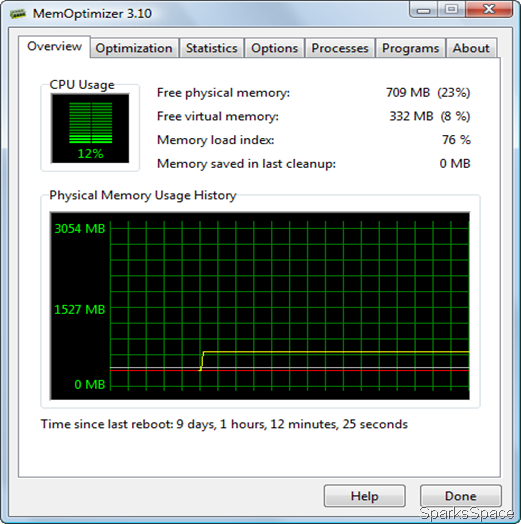
Whenever a Windows based program is running, it's consuming memory resources - unfortunately many Windows programs do not "clean up" after themselves and often leave valuable memory "locked", preventing other programs from taking advantage of it and slowing your computer's performance! In addition, memory is often locked in pages so if your program needed 100 bytes of memory, it's actually locking up 2,048 bytes (a page of memory)! .This lead to Slow Performance, Slow Web Browsing, Slow Startup Speed, Program Crashes, Computer Crashes, Data Loss and File Damage The only way to free up this "locked" memory was to reboot your computer.
Use MemOptiizer to overcome this problem. It monitors your system in the background and frees resources when these are required. The result is that your programs will run faster and be more stable than ever before.
- Speed up your computer by managing your memory
- Automatically recovers memory left by closed programs
- Optimizes your memory in critical situations and prevents crashes
- See exactly how much memory you have at all times
Sys Req:Windows 2000/XP/2003 Server/Vista 1.32MB
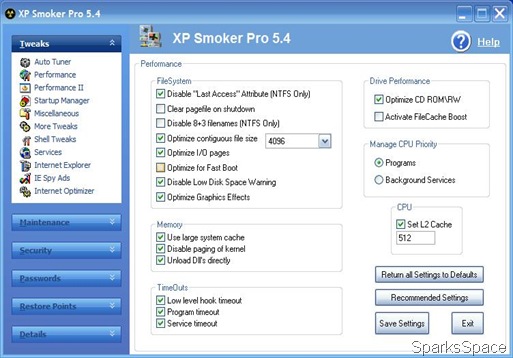
XP Smoker Pro is a powerful tweaking utility designed specifically for Windows XP . It allows you to change a multitude of settings in the registry. These settings can improve the performance of your computer drastically.
XP Smoker Pro includes a good internet optimizer that runs a series of tests to optimize your internet connection for blazing fast surfing no matter what connection speed you have whether it be broadband or dialup. This aslo includes 94 extra security settings and tweaks to get your PC truly smokin!. Compatible with Windows XP Service Pack 3 (SP3).
XP Smoker Pro now includes "DriveFreeze" a new feature to lock down your removable storage devices so nobody can use them without your permission. You can lock down USB drives, CD-ROM/DVD drives, and floppy drives
4Shared | Mirror | Mirror 2- Part1 Part2 Part3 Part4 | Rapidshare
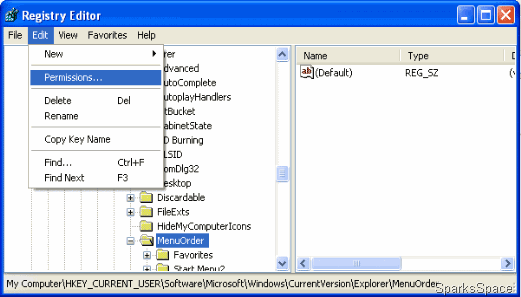
Start the Registry editor: Start > Run > regedit > [Enter]. Navigate to HKEY_CURRENT_USER\Software\Microsoft\Windows\CurrentVersion\Explorer\MenuOrder
Right click on the MenuOrder folder, choose Permissions; go to Advanced in the new window that pops up, and uncheck the entry Inherit from parent the permission entries that apply to child objects. Include these with entries explicitly defined here. A security dialog box will open up; choose Copy. This will take you back to the Advanced Security Settings for MenuOrder dialog. Click OK here.
In the Permissions dialog, uncheck Full Control in your account and security groups. Don’t change the Read permission. Reboot the computer and all your menus will be alphabetically sorted.
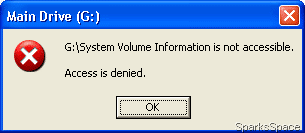
If you use System Restore, you must have noticed the System Volume Information folders in the root of each of your drives. This folder stores the files used by System Restore. Their sizes can sometime balloon to gigabytes, because System Restore doesn’t delete your older restore points when creating a new one. Moreover, every time you try to access the folder, you get the Access Denied error. Oh, and you can’t delete the folder, either. So what do you do when you want to view its contents?
In an Explorer Window, go to Tools > Folder Options > View. Here, choose Show Hidden Files and Folders. Uncheck Hide Protected Operating System Files and Use Simple File Sharing.
You should now be able to access the System Volume Information folder; if not, you’ll have to add yourself to the list of users allowed to access the folder. Right click on System Volume Information and go to Properties > Security. Click Add under Groups or User names and enter your username in the dialog that appears. Click OK, and in the bottom half of the Security tab, grant yourself all the permissions.
Office Live Workspace is an online space provided by Microsoft for saving, accessing, and sharing documents and files. Using it one can access his / her documents from anywhere over an Internet connection via Web browser.This tool can be used for grouping information for work, school, and personal projects.
Office Live Workspace emphasizes collaboration rather than composition. To share documents with other people, you can send them a secure URL without requiring them to sign in with a Windows Live ID. Everyone with access to the workspace can make and view each others' comments.
Those invited for editing can make changes to the work, as long as they have Word, Excel, and PowerPoint on their hard drive. Office Live Workspace handily preserves the Track Changes feature from Office apps while also keeping five histories of a file. And the Share View screen allows control of another user's PC
Access files from anywhere
- Access documents from almost any computer with a Web browser
- No more flash drives - documents are there when and where you need them
- Password-protected document sharing; you control who can view and edit your work
Work with programs you know
- Save over 1,000 Microsoft Office documents in one online place
- Open and save files directly from familiar programs like Word, Excel, and Power Point
- Synchronize contact, task, and event lists with Outlook
One just needs to sign up and and get a Windows live ID to start using it. The web interface of Live Workspace is very well designed, making it very easy to use. One can create office documents on their machines and directly save them in the provided Web space (using .NET passport).
Another great feature of this workspace is proper management of different versions of the same document. This helps in better understanding of content and even enables one to rollback to a previous version if required.
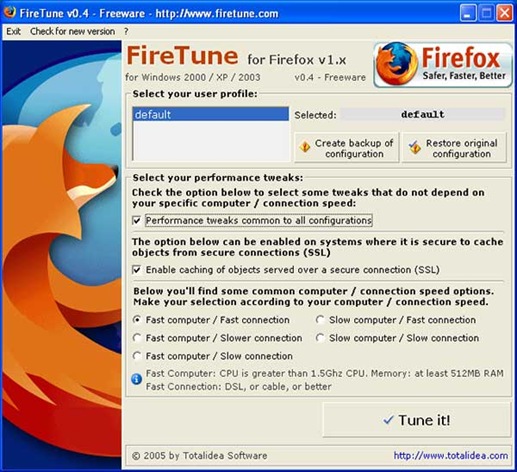
Usually you have to optimize Firefox manually, which can be time consuming and difficult for the novice user.For that you have to type about:config at the Firefox URL bar, a bunch of advance settings will appear,and it is an easy process
According to your specific computer speed and internet connection speed, FireTune will optimize several internal settings of Firefox for better performance.FireTune ensures an easy and fast optimization of your browsing experience with Firefox. FireTune does NOT modify the Firefox executable, or any other Firefox binary file. Everything can be undone easily at a single mouse click only.FireTune can be used with Firefox v1.x / 2.x / 3.x versions
How to tell whether Firefox is faster after optimizing it:
- Clear the cache of Firefox from the Firefox settings dialog - this is very important!
- Before you optimize Firefox, navigate to http://www.numion.com/stopwatch/ and do a speed test on www.mozilla.org/products/firefox/
- The time needed to load the site completely will be displayed to you in the browser window. Write down the time
- Clear the cache of Firefox from the Firefox settings dialog again - this is very important!
- Now, close Firefox, and optimize it with FireTune
- Start Firefox again, and repeat the speed test on www.mozilla.org/products/firefox/
- Compare the displayed result with the result from the test before the optimization
Download Sys Req:Mozilla Firefox 1.x, 2.x, 3.x Freeware 621 KB
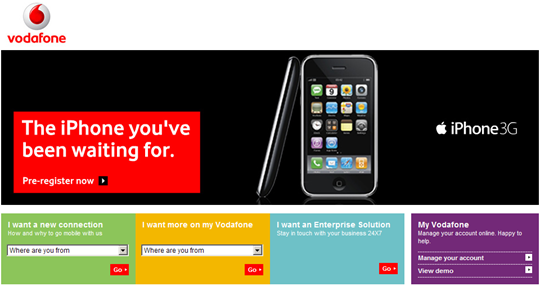
Vodafone India has started pre-registering customers for the iPhone 3G from Apple, promising that the device will be available soon, but the company will as yet not disclose when the device will be offered to customers.
Check here
This error message too often appearing on your Windows Vista computer ?
After you install Windows Vista it will begin looking through your hard disks and building an index of your files. This is done in the background at a very low priority so as not to disturb you too much, so this process can take a long time. During this time, you will notice your hard drive light is constantly flashing.
This method effectively stop and disable all search indexing processes, and is the recommended way.
1. Click on Start button, then select Control Panel -> System and Maintenance -> Administrative Tools, and double click on Services applet. Alternatively, simply type “Services” (without quotes) in Start Search box.
2. If User Account Control asks for permission, click Continue.
3. Locate an service named Windows Search. Right click on Windows Search, and then select Properties on contextual menu.
4. Click on Stop button to stop the indexing service immediately.
5. On the Startup Type drop down box, select Disabled.
6. Click on OK button.
To re-enable the Windows Search, simply change back the Startup Type.
Disable Indexing on Drives
This method allows users to selectively disable indexing on certain drives which rarely used or searched. However, it may take a long time to apply new attributes to all files, folders and sub-folders to exclude them from indexing.
1. Open Windows Explorer from Accessories.
2. Right click on the drive (or drive letter) that you want to turn off the indexing.
3. Select Properties on the contextual menu.
4. Uncheck(untick) the Index this drive for faster searching option.
5. Click Apply or OK button.
To re-include the drive, simply select the option again.
Here is the good news. Microsoft has finally released a small patch that updates Windows Search Indexer (SearchIndexer.exe) and should cure the problem permanently. Here’s a direct link incase you like to skip the mandatory Windows validation check.
If you want to make a list of all the contents of a directory, you’re going to have to find a much easier way than typing it all out. If it’s a multi-GB music directory, you’ll end up with aching fingers before you’re even halfway through. Here is an easier way. You can create a small batch file, and then add it to the right click context menu, so that all you will have to do is right-click and select “Print Directory Contents” (or something like that).
First, open Notepad, and type in the following:
@echo off
dir %1 /o:g > c:\directory.txt
start /w notepad /p c:\directory.txt
del c:\directory.txt
exit
Save this in the root of the C drive as “print_directory.bat”. Now, in order to add this option to the right-click context menu, you will need to edit the default folder properties. In Windows Explorer, go to Tools > Folder Options > File Types. Click on the “File Folder” file type and then click on the Advanced button at the bottom right. Now, click on the “New…” button. In the Action field, enter the name of the action, such as “Print Directory” or “Print Contents”, and in the “Application to be used to perform this action” field, fill in “C:\print_ directory.bat”. Click OK thrice and then close to exit.
Before you do anything, check to see that if you double-click a folder it actually opens normally, because sometimes the Search function gets set as default. You really don’t want to have to right-click every folder and select Open. So let’s fix this first Open the Registry Editor and navigate to
HKEY_CLASSES_ROOT\Directory\shell\
Edit the default value (which might have changed to “Open” or “Find”) and change it to “Explorer”.
Now make sure you can double-click and open folders again, and then you’re ready to test the Print Contents / Directory command you just made.
Right-click on a directory and select “Print Directory” (or whatever you called it). You will get a pop-up that will ask you where to save “directory.mdi”. This is the Microsoft Document Imaging format, which makes a nice, neat, and readable file that will list out the contents of the directory. Rename it to the name of the directory, and then save it. It will open with Microsoft Office Document Imaging.
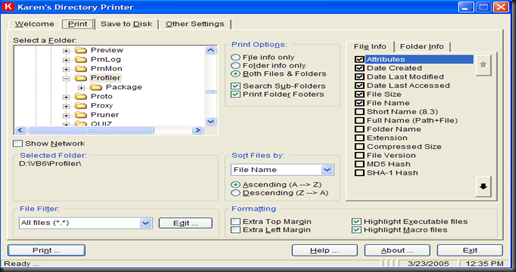
You can also try Karen’s Directory Printer v5.2.6 for printing a Directory
It can print the name of every file on a drive, along with the file´s size, date and time of last modification, and attributes (Read-Only, Hidden, System and Archive)! And now, the list of files can be sorted by name, size, date created, date last modified, or date of last access
Download | Freeware |1.25MB
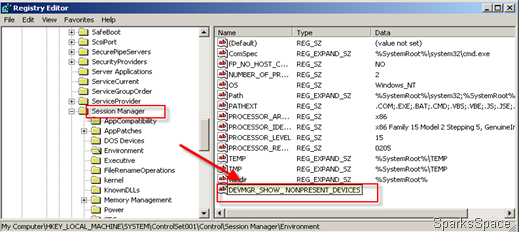
There is a list of hidden devices that do not normally show up in the Device Manager. You can get XP to reveal these by either changing a Registry entry, or by creating a batch file to launch the Device Manager with the correct options
If you’re comfortable with the Registry, open the Registry Editor and navigate to
HKEY_LOCAL_MACHINE\SYSTEM\ControlSet001\Control\SessionManager\Environment\.
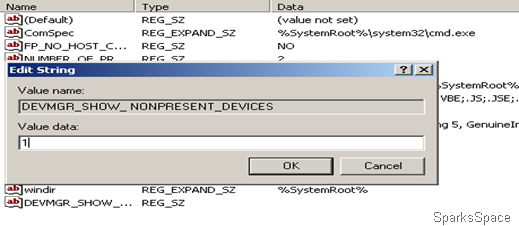
Here, create a String Value called DEVMGR_SHOW_ NONPRESENT_DEVICES, and give it a value of 1.
If you’d rather create a batch file, open Notepad, and type in the following:
@Echo Off
Prompt $p$g
set
DEVMGR_SHOW_NONPRESENT_DEVIC
ES=1
start devmgmt.msc
exit
Then save it as “devmgmt.bat”. You can use any descriptive filename you like with the .bat extension.
If you’re on a network and are tired of waiting for ages for all the network shares to load, this is a tip you’ll love. There are four basic things you need to do in order to speed up network access:
1. Remove all shortcuts in My Network Places. These are automatically generated, and if a few of them aren’t shared anymore, Windows will keep searching for them anyway. So just select them all and delete them.
2. Stop Windows from automatically adding these shortcuts to shared folders, otherwise you’ll just end up having to delete the shortcuts every time you open My Network Places. This is a registry hack, so make sure you backup your registry. First, go to Start > Run, type in “regedit” and press [Enter]. Navigate to
HKEY_Current_User\Software\Microsoft\Windows\CurrentVersion\Policies\Explorer\.
Here, create two new DWORD values (if they don’t already exist) called “NoRecentDocsNetHood” and “UseDesktopIniCache”, and set them to “1”.
3. Have everyone on your network increase the send buffer for network data. Tell everyone who shares files or folder to go to
HKEY_LOCAL_MACHINE\SYSTEM\CurrentControlSet\Services\LanmanServer\Parameters\.
Create a DWORD value called “SizReqBuf”, and assign its Hex value to “FFFF”.
4. Just stop using My Network Places for folders you access on a regular basis, and instead, map the drive by going to Tools > Map Network Drive in Windows Explorer.
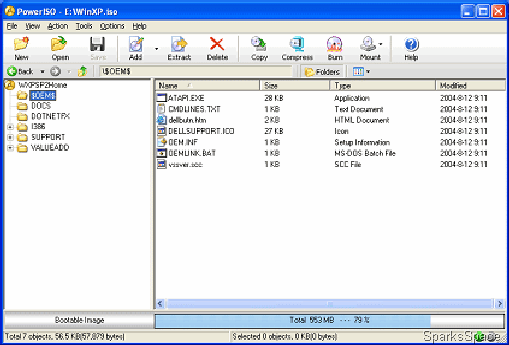
PowerISO is a powerful image processing and file compression tool, which allows you to create, extract, compress, edit and convert ISO/BIN image files, and mount these files with internal virtual drive. Most of all, the compressed files can be used directly without decompressing. Supports almost all CD/DVD-ROM image file formats (ISO, BIN, NRG, DAA, etc).
Main Features:
- Support almost all CD/DVD-ROM image file formats(ISO, BIN, NRG, CDI, DAA and so on).
- Open and extract ISO File.
- Create ISO file from hard disk files or CD/DVD-ROM.
- Edit an existing ISO file directly.
- Convert image files between ISO/BIN and other formats. PowerISO can convert almost all image file formats to standard ISO format file.
- Make bootable ISO file, get boot information from bootable ISO file.
- Make floppy disk image file.
- Optimize files to save disk space while saving ISO file.
- Mount ISO file with internal virtual drive. You don't need install any other virtual drive software.
- Can be used easily. PowerISO supports shell integration, context menu, drag and drop, clipboard copy paste...
Sys Req:Windows98/Me/2000/XP/2003/Vista Date Updated:18-06-08
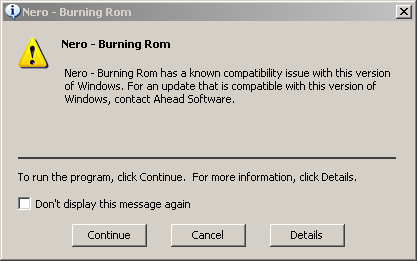
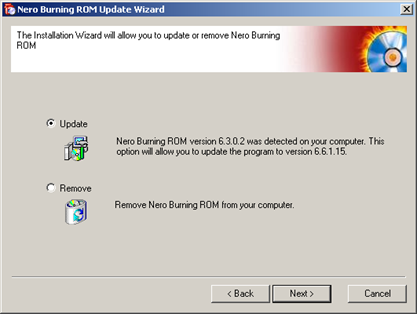
For Power ISO 3.8 Check hereWhen you start Nero 6/7 ,you get a message: Nero - Burning Rom has a known compatibility issue with this version of Windows. For an update that is compatible with this version of Windows, contact Ahead Software.
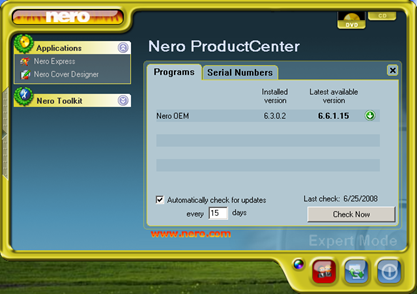
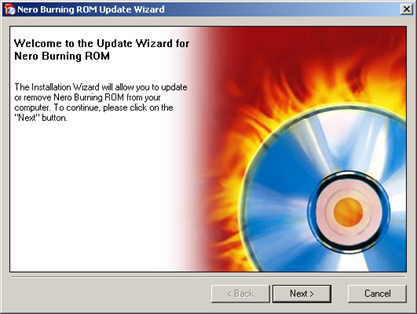
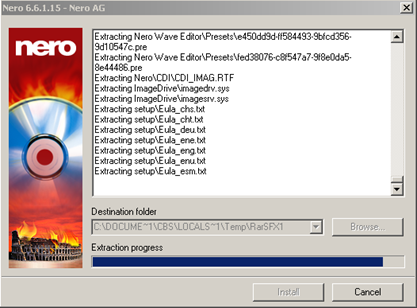
To resolve this issue, update to the latest version of Nero 6.0. The steps are provided below on how to update to the latest version of Nero 6.0 OEM and how possible options in SP2 may prevent the download update(You must be logged on as an administrator to install this update)
(Windows XP SP2 may place the option to download in the Information Bar. You may need to allow the download by selecting the Download File option in the Information Bar.)
If you have Vista and XP in dual-boot and want to get rid of Vista, its boot loader is an obstacle. To get rid of Vista, insert your Windows XP CD and boot from it. Remember to set your first boot device as your CD/DVD drive. Press a key when it tells you to during boot up. When prompted, press [R] to load the Recovery console. Confirm your Windows installation by entering the number. Enter your Administrator password at the prompt. On the prompt, type fixmbr and then type fixboot.
Reboot and you should be able to boot into Windows XP. Make sure you have backed up all critical files. Then format the partition on which Vista was installed to clear out Vista. Another way to do this is to insert your Windows Vista CD and boot into Windows XP as usual. Go to Start > Run, type X:\boot\bootsec.exe /nt52 ALL /force. (Replace X with your CD/DVD drive letter). Reboot and format the Vista partition
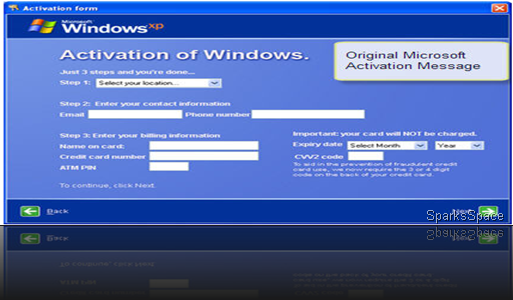
Windows XP activation can be backed up to a floppy for later retrieval in case of a reinstall. How is this done?
Navigate to the %systemroot%\system32 folder. Copy the wpa.dbl and wpa.bak files to the floppy. Reinstall XP. After the install is complete and the XP Out Of Box Experience (OOBE) window appears—where you’d normally activate the product—decline to activate and let the installation complete.
Restart and use [F8] to bring up the Advanced Boot Options menu. Select Minimal Safe Mode here. Navigate to the %systemroot%\system32 folder. Rename the existing wpa.dbl and wpa.bak files. Using the floppy diskette, copy the previously backed-up wpa.dbl and wpa.bak to the %systemroot%\system32 folder. Reboot; XP should be activated.
The steps to perform the task differ for domain and workgroup scenarios.
To create a password reset disk:
1) Insert a blank floppy disk into drive.
2) Open User Accounts in Control Panel.
3) Double-click on your account name.
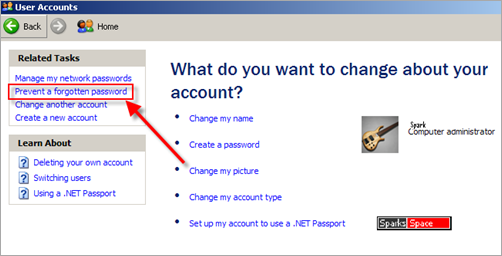
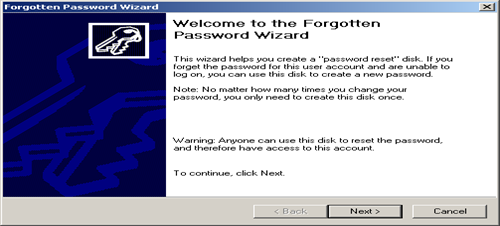
4) On the left side of the window, under Related Tasks, select Prevent a forgotten password. A wizard will pop up and walk you through the process of creating the password recovery disk. If the related tasks does not show up you are not double clicking on the user account or you are using a LAN with domains.
If your computer is on a domain, you can create the Domain Password Reset Disk as follows.
1) Press CTRL+ALT+DELETE to open the Windows Security dialog box.
2) Click Change Password.
3) In the "Log on to" click on the down arrow to select local XP machine.
4) Click Backup to open the Forgotten Password Wizard. If you don't see the Backup button you did not select the computer in step 3 correctly.
5) Click Next and then follow the instructions as they appear on the screen.
You will be prompted to create a new password. Remember, anyone who has the password reset disk can access the system, so don't forget to store your disk in a safe place!
Microsoft help here:
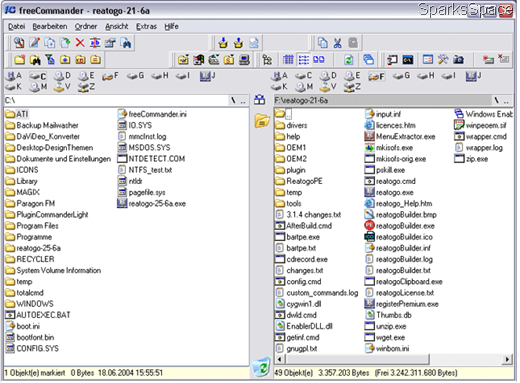
A Windows Explorer alternative that packs a punch, Free Commander is a portable application that can be used from a CD or USB stick . Copy the installation directory to the media and use the program on any computer... just like that!
Free Commander features a dual-panel window which, divides your screen into two halves. You can open folders in both these panels. If you choose to open more windows in the panel, they are displayed under tabs. You toggle between viewing folders in a column with sub-menus, or in rows. The software can handle archives to open ZIP, CAB, and RAR files. You can also preview images just like in the Explorer shell.
Apart from the usual copy, paste, rename, move, and delete functions, Free Commander also allows you to delete files for good (shred them). It allows you to change the attributes of any file. While running a search, the software can even look inside compressed archives. You can assign other programs to Free Commander for opening specific file types. For example, freeware like ATViewer
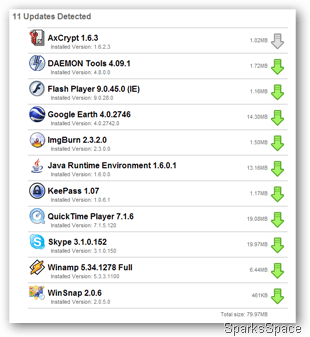
If you like to have all your software updated down to the last decimal, this little tool is most certainly for you. Update Checker runs a quick scan on all the programs on your computer, then opens up a Web page and tells you which ones can be upgraded.
Update Checker Web site maintains a version number database of programs along with download information, which registered users can update. Upon a scan, Update Checker compares the version numbers there to those of the programs it finds. Next, a Web page with the download information for the new version is opened.
Sys Req: Windows Vista, XP, 2003, 2000, ME or 98/Microsoft .NET Framework 2.0
Download | 149KB |Freeware
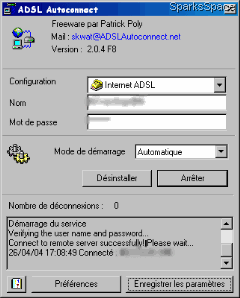
ADSL Autoconnect is a software designed to optimize your ADSL connection.Using ADSL Autoconnect, your ADSL connection will open automatically when Windows starts-up. The program will automatically reconnect and the connection can be reinitialized at a specified hourly interval. IP address changes can be sent by e-mail or by ftp post . Will display transfer rates when sending and receiving.Support : Windows 98/SE, Windows Me, Windows NT4/SP6, Windows 2000 all versions, Windows XP all retail versions.
Features
- Open an ADSL connection at Windows’ Startup
- Automatically reconnect
- Reinitialize the connection every X hours
- Notify IP address changes (Mail, FTP, Post)
- Show transfer rates


