Customizing Startup Programs for Different Users
Windows handles the startup programs differently for each user. Certain programs may start up for one user but not for another. All of these settings are stored in the System Registry.With the help of the registry editing utility, regedit, you can manually change these entries.
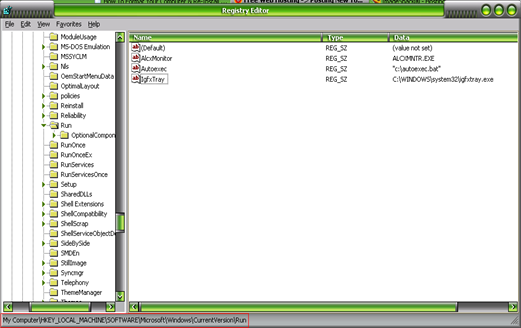
But first, a word about the structure and where the startup programs are located in the registry. The registry stores startup information in two places for every user. It stores which programs will start for a specific user under the user’s registry entry. It also stores a list of programs that will start automatically in the local machine entry. All of the programs listed in this entry will start automatically for all users on the computer. Now that you know the two different types of startup items, user-specific and all user entries, you can begin hacking the registry to change the startup programs. First, you will find out how to modify the startup programs for all users, then you will learn how to modify the startup programs for individual users. To modify all user’s startup programs, you will need to start up the Registry Editor and follow these steps:
Keep in mind that if you delete a program entry, there is no way to undo the action.,so you have to create a restore point.
1. If you have not already done so, start up the Registry Editor by clicking the Start button and selecting Run. Then type regedit in the text box and click the OK button.
2. Once the Registry Editor is started, expand the entry labeled HKEY_LOCAL _MACHINE. Then scroll through the list and expand the entry labeled SOFTWARE. Scroll through the list again until you locate Microsoft and expand it. Then scroll through the list once again and expand Windows. Next, you will want to expand CurrentVersion. After you have gotten this far, you just have to expand Run and you will see a list of all of the startup programs.
3. If you want to remove a startup program, just right-click the name and select Delete.
4. If you want to add an additional startup program, right-click the white background on the right-hand side and select New and then select String Value.Type in a name for the entry and then press Enter. After you have the new entry named, right-click it again and select Modify. Then enter the path to the executable file in the value box and click the OK button.
That’s it. You now know how to add and remove programs that will start up for all users on the computer. The steps for modifying the startup programs for specific individual users are very similar. The only difference is you have to go to a different place in the registry. Follow these steps to modify user-specific startup programs:
1. First, the easiest way to edit a specific user’s startup programs is to log into their account.
2. Then, once you are logged into the user’s account, you will want to start up Registry Editor again by clicking the Start button, selecting Run, and then typing regedit in the text box. Click the OK button.
3. After Registry Editor is open, you will want to navigate to the HKEY_CURRENT_USER entry and expand it. Then scroll through the list and expand Software. After expanding Software, scroll through the list again and select Microsoft. Then expand the Windows entry and then the CurrentVersion entry. After a little more scrolling, you will find the Run entry. This is where all of the startup information for a specific user is stored.
4. Add and remove string values from this section, as was indicated in step 4 of the previous list, to modify the startup programs.


0 comments