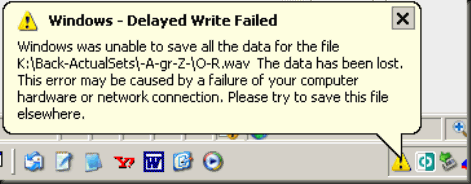
‘Delayed Write Failed ‘ Error
When you save or move documents or during general file-management activities in Windows XP, you may intermittently receive "Delayed Write Failed" error messages.
Some common reasons for a delayed-write failure are:
- Problems with a device driver, especially a SCSI or RAID device driver. Some RAID device drivers are known to issue spurious “Delayed Write Failed” errors in XP Service Pack 2. Most manufacturers have been alerted to this, so check to make sure the disk drivers are up-to-date.
- Cabling problems. A faulty or broken cable — especially for an external USB or Firewire enclosure—can generate this error. It can also happen if the cable is too long, or if it is hooked up through a hub that isn’t up to spec. Another possible culprit is if you have a UDMA drive that requires an 80-pin cable, and you are using a 40-pin cable.
- SCSI termination errors. This has become less likely with the advent of self-terminating SCSI hardware, but it shouldn’t be counted out.
- Media errors. This is the worst possible scenario — essentially, drive failure. If you can garner statistics on the drive via SMART (such as SMART & Simple (http://www.beyondlogic.org/solutions/smart/smart.html), you may be able to determine if there’s a mechanical failure in the offing. Gibson Research’s SpinRite tool (http://grc.com/) is also useful for assessing media errors, but be warned: It may take a long time to do a thorough test.
- BIOS settings on the computer are forcing faster UDMA modes than the drive controller can handle. This is unlikely, especially with newer hardware (which can support UDMA far more flexibly), but it can usually be fixed with a BIOS upgrade, or by resetting the BIOS entries for the hard drives to auto-detect settings. Devices set to UDMA Mode 6 that produce this error, for instance, might need to be set to Mode 5.
- Controller issues. I’ve observed that USB controllers that contend strongly with other hardware can produce this error. In systems that have both “long” and “short” PCI slots (i.e., 64-bit and 32-bit), try moving the USB controller to the long slot. Older PCI cards will not fit in such a slot.
- Memory parity issues. If the problem appears after installing new memory, the memory in question may be faulty or not of the correct type for the motherboard in question. (This may go hand-in-hand with other problems such as random lockups, too.)
- The LargeSystemCache Registry tweak and ATI video adapters. One peculiar set of circumstances that has been observed on multiple machines with ATI video adapters and more than 512MB of memory involves the LargeSystemCache Registry setting,a DWORD entry found in HKEY_LOCAL_MACHINESYSTEMCurrentControlSetControlSession ManagerMemory Management. This setting governs the amount of memory set aside by the system for certain kernel processes. If it’s set to 1 (which allegedly improves performance on systems with more than 512MB of memory), it can cause data corruption on some systems, and produce the “Delayed Write Failed” error. Try resetting it to 0 if it’s been set.Resolution
- Verify that you have sufficient space in your RAM or disk overlay to accommodate write-intensive situations. Consider adding additional RAM or extra disk space.
- In the Enhanced Write Filter component settings in Target Designer, select Use Less Overlay Space & Less Writes.
- Review the write operations made by your applications and, if possible, minimize them.
- Make sure that the background disk defragmentation service is turned off.
Windows may display this error when an external drive is used that has caching enabled. It is recommend you disable caching on the external drive by performing these steps (the following instructions are for Windows XP):
- Go to Administrative Tools in the Control Panel
- Double-click Computer Management and navigate to Computer Management (Local) -> Storage -> Disk Management
- Right-click on the drive on the external drive shown in the Volume column and select Properties from the pop-up menu
- Go to the Hardware tab, select the drive from the list and click the Properties button
- Go to the Policies tab, select Optimize for quick removal, and click the OK button
- If you have other external drives you also want to change the settings for then repeat steps 4 and 5 for each drive
Read further : http://support.microsoft.com/kb/330174


0 comments